WE'VE DONE THIS A FEW TIMES
We know all the ways to make the installation process easy, so here you go. Watch the video
Figure out how much Fiber you’ll need.
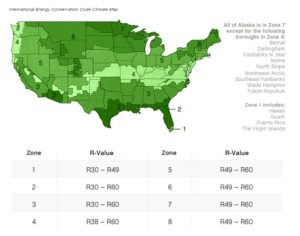
- First, use this handy-dandy map to determine the R-value recommended for your region. R-value indicates insulating power or thermal resistance (chart below).
 - Once you know your target R-value, refer to the Greenfiber Insulation Coverage Chart (on Greenfiber Insulation product bag or see the charts we provide here). This chart will indicate, for a 1,000-square-foot area, how many bags of our insulation you’ll need and how many inches of coverage you’ll need.
 - To calculate exactly how much insulation you’ll need for a specific number of square feet, you can use the following table provided by the U.S. Department of Energy Insulation Recommendations for Existing Houses.*

 
How to calculate R-value:
* These recommendations are cost-effective levels of insulation based on the best available information on local fuel and materials costs and weather conditions. As a result, the levels may differ from current local building codes. Our lawyers want us to add that the apparent fragmentation of the recommendations is an artifact of these data and should not be considered absolute minimum requirements.
Gather all the items you’ll need to complete the job.
Most of these tools and materials are likely already in your home.
Test the blower machine before leaving the store to make sure it works properly.
Ensure you have at least 100 feet of blowing hose for the installation.
Here’s your list:
The correct number of bags of insulation for the R-value you need.
A blowing machine with 100 feet of hose. Place the machine outside your home on a level surface or in your garage.
A heavy-duty 12-gauge extension cord.
A tarp to place under the blowing machine to catch excess material.
A ladder for attic access if needed.
Safety eyewear and N95 NIOSH-approved particulate masks, such as 3M model #8210 or #8511, or an equivalent, for protection against nuisance dust.
Adequate attic lighting for installation.
A ruler or other measuring tool to monitor insulation depth.
Soffit vent chutes (if needed).
Soffit baffles.
Metal barrier material to provide a three-inch clearance around recessed lights and other heat sources. Do not use paper, cardboard, or any combustible materials as a barrier.
A vehicle to transport the blowing machine, insulation, and other materials. A pickup truck is sufficient for most jobs.
Get Ready
Set the blowing machine on an even surface for stability.
Connect it to a 20-amp, 110-volt household power outlet.
Keep insulation clear of heat surfaces and recessed lighting to prevent hazards.
Steps to Install Attic Insulation
Identify locations of recessed lights, furnace flues, heating vents, chimneys, and other sources of heat or combustion in the attic. Install barriers around heat sources with at least 3 inches clearance, following local code requirements. (Heat trapped by insulation can be a fire hazard.)
Use baffles or vent chutes to maintain attic ventilation. Ensure insulation does not cover soffit vents.
Determine the desired installed thickness of insulation, then measure and mark the rafters as a guideline for application.
Prepare a rigid barrier around the attic access hole to prevent insulation from spilling out when the attic door is opened. The barrier should match your planned insulation height.
Place the blowing machine on a level surface outside the building or in a garage.
Plug the machine into a 110-volt electrical outlet (20 amps or greater) using the shortest, heavy-duty extension cord possible (minimum 12-gauge).
Attach the hose to the machine and run it from the blower to the attic through the access hole, avoiding sharp bends or kinks.
Adjust airflow: open the product slide gate 3/4 of the way, or on some machines, close the air valve to about 1/4 inch.
Position one person in the attic to operate the application hose and another near the blower to load insulation into the hopper.
Consider placing a kneeboard across the ceiling joists for stability when standing or kneeling.
Open a bag of insulation and feed it gradually into the hopper, breaking it up by hand to avoid clumps and prevent clogging. (Only reuse spilled insulation if it’s free of debris.) Keep hands, feet, and clothing away from moving parts.
Do it!
Okay, you’re ready to get this done. But just a couple more tips:
Before you start, use soffit vent baffles to allow the soffit to stay open above the insulation for proper airflow.
After you’ve finished blowing Greenfiber, insulate the inside of the access hole cover with batt or foam board insulation to complete the job.
Ready, set, go !
Identify locations of recessed lights, furnace flues, heating vents, chimneys, and other sources of heat or combustion in the attic. Install barriers around heat sources with at least 3 inches clearance, following local code requirements. (Heat trapped by insulation can be a fire hazard.)
Use baffles or vent chutes to maintain attic ventilation. Ensure insulation does not cover soffit vents.
Determine the desired installed thickness of insulation, then measure and mark the rafters as a guideline for application.
Prepare a rigid barrier around the attic access hole to prevent insulation from spilling out when the attic door is opened. The barrier should match your planned insulation height.
Place the blowing machine on a level surface outside the building or in a garage.
Plug the machine into a 110-volt electrical outlet (20 amps or greater) using the shortest, heavy-duty extension cord possible (minimum 12-gauge).
Attach the hose to the machine and run it from the blower to the attic through the access hole, avoiding sharp bends or kinks.
Adjust airflow: open the product slide gate 3/4 of the way, or on some machines, close the air valve to about 1/4 inch.
Position one person in the attic to operate the application hose and another near the blower to load insulation into the hopper.
Consider placing a kneeboard across the ceiling joists for stability when standing or kneeling.
Open a bag of insulation and feed it gradually into the hopper, breaking it up by hand to avoid clumps and prevent clogging. (Only reuse spilled insulation if it’s free of debris.) Keep hands, feet, and clothing away from moving parts.